Session View per Fuß
Morningstar Live Clips ist ein Remote Script für Ableton Live, mit dem ein Morningstar MC6 Pro die Session View steuert: Spuren und Szenen auswählen, Clips aufnehmen, abspielen und stoppen — ohne die Hände vom Instrument zu nehmen. Es läuft parallel zu Push; Push folgt der Auswahl automatisch.
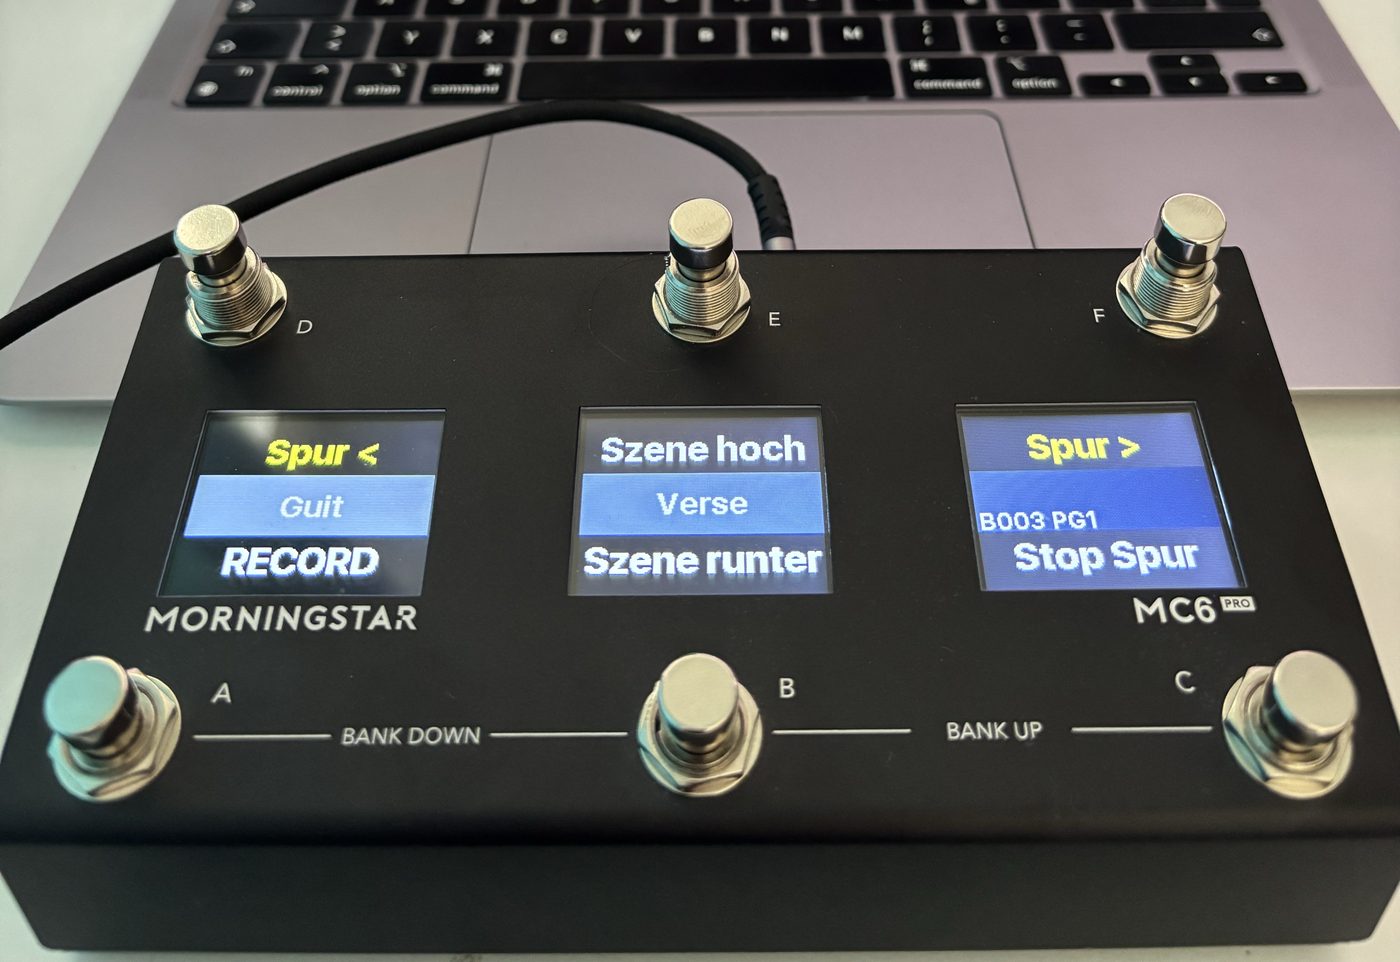
Das MC6 Pro zeigt dabei an, was in Live passiert: Spurname und Szene auf den Displays, RECORD oder PLAY auf dem Rec-Schalter, rot während der Aufnahme, grün solange auf der Spur ein Clip läuft. Nach jeder Aufnahme springt die Auswahl automatisch zur nächsten Spur.
Voraussetzungen: Mac mit Ableton Live und einem Morningstar MC6 Pro per USB. Andere MIDI-Fußschalter funktionieren für die Steuerung genauso; LED- und Display-Anzeige sind auf das MC6 Pro (bzw. MC8 Pro) zugeschnitten.
Erste Einrichtung
Installation
⚡ So geht's: das neueste Release
als ZIP laden (unter „Assets“, nicht „Source code“), entpacken und im Terminal im Ordner
sh install.sh ausführen — das kopiert das Remote Script an die richtige Stelle.
Danach geht es mit „Live einrichten" weiter.
🎛 Mit LooperDisplay: LooperDisplay
bringt MorningstarClips gleich mit — dessen ./install.sh --with-clips installiert
das Script, die MC6-Pro-Bank liegt im Download unter Presets/Morningstar MC6 Pro.
Vorlage für Live
MorningStarTemplate.als ist ein fertig eingerichtetes Live-Set zum
Ausprobieren und Weiterbauen: Aufnahme-Bereich von > Guit bis Drums <,
eine Spur ohne Input dazwischen, eine Looper-Gruppe für LooperDisplay und je ein Reverb- und
Delay-Return. Sie liegt dem LooperDisplay-Download bei; ./install.sh --with-clips legt sie nach
~/Music/Ableton/User Library/Templates — dann steht sie in Live im Browser unter
Vorlagen. Eine vorhandene Datei gleichen Namens wird nicht überschrieben.
Die Drum-Sounds kommen aus dem Ableton-Pack Drum Booth. Fehlt es, bietet Live an, das Pack nachzuladen. Braucht Live 12.
Im ZIP
1 Remote Script kopieren
Das erledigt install.sh. Von Hand: den Ordner MorningstarClips nach
~/Music/Ableton/User Library/Remote Scripts/
kopieren.
Ableton Live
Live einrichten
2 Bedienoberfläche auswählen
- Live starten oder neu starten — Remote Scripts werden nur beim Programmstart eingelesen.
Einstellungen → Link, Tempo & MIDIöffnen.- In einer freien Zeile der Bedienoberflächen
MorningstarClipswählen. Push bleibt in seiner eigenen Zeile.
| Bedienoberfläche | Eingang | Ausgang |
|---|---|---|
MorningstarClips | Morningstar MC6 Pro | Morningstar MC6 Pro |
Der Ausgang ist für LEDs und Displays nötig. Unten bei den MIDI-Ports für das MC6 Pro Track und Remote ausschalten — sonst landen die CCs zusätzlich auf scharfgeschalteten MIDI-Spuren.
✅ Klappt alles, erscheint unten in Lives Statusleiste „Morningstar Clips geladen".
Morningstar Editor
MC6 Pro einrichten
3 Fertige Bank laden
Im Ordner MorningStarPresets liegt die Bank „PUSH CTRL" —
Namen, CCs, Toggle Mode und Farben sind darin schon eingestellt.
- MC6 Pro per USB verbinden und den Morningstar Editor öffnen.
- Die Bank-Datei als Bank-Backup wiederherstellen und auf einen freien Bank-Platz legen.
- Unter Controller Settings → MIDI Channel Kanal 1 einstellen (Empfang für LEDs und Displays).
Oben stehen die Namen von D, E, F, unten die von A, B, C. In der Mitte: ausgewählte Spur und Szene.
Presets selbst anlegenoptional▶
Jede Nachricht: Typ CC, Kanal 1, Wert 127. E sendet mit Aktion Press schon beim Antreten. Alle anderen haben zusätzlich eine Long Press-Nachricht — ihre kurze Nachricht steht deshalb auf Release, damit das MC6 Pro kurz und lang sauber trennt.
| Schalter | Kurz | Lang (Long Press) | Toggle Mode |
|---|---|---|---|
| D | Start Szene · CC 33 · Release | Spur links · CC 22 | aus |
| E | Szene hoch · CC 20 · Press | – | aus |
| F | Stop Szene · CC 34 · Release | Spur rechts · CC 23 | aus |
| A | Record / Play · CC 25 · Release | Letzte Aufnahme löschen · CC 31 | an · Position 2 rot |
| B | Nächste Szene, erste Spur · CC 21 · Release | Clips 2 Szenen tiefer kopieren · CC 32 | aus |
| C | Stop Spur · CC 27 · Release | Transport stoppen · CC 35 | an · Position 2 grün |
Bei A und C alle Nachrichten auf Toggle-Position Both stellen, sonst senden sie nur bei jedem zweiten Tritt. Ab wann ein Druck als lang zählt, legt Controller Settings → Long Press Time fest.
Weitere Funktionen gehen genauso als Long Press, z. B. Undo (CC 29) oder Clip löschen (CC 30).
⚠️ Eigene Bank sichern: Das Script überschreibt Namen auf dem MC6 Pro vorübergehend — ein Backup aus dem Editor würde diese Anzeigen mitspeichern. Vorher Live schließen (oder das Script abwählen) und am MC6 Pro einmal die Bank wechseln und zurück.
Auf der Bühne
Bedienung
- D — START SCENEstartet die ausgewählte Szene im Aufnahme-Bereich: Clips der Szene starten, Spuren mit leerem Slot stoppen
- F — STOP SCENEstoppt die Clips der ausgewählten Szene im Aufnahme-Bereich
- D / F lang drückenSpur links / rechts
- ESzene hoch
- Bnächste Szene, auf die erste Spur im Aufnahme-Bereich
- A — RECORDleerer Slot: Spur wird scharfgeschaltet, Aufnahme startet
- A — während der AufnahmeAufnahme endet, der Clip spielt, die Auswahl springt zur nächsten Spur
- A — PLAYgestoppter Clip im Slot: Clip startet, die Auswahl springt zur nächsten Spur
- Cstoppt die Clips der ausgewählten Spur
- A lang drückenlöscht rückwärts die letzte Aufnahme und wählt ihren Slot wieder aus — jeder weitere lange Druck löscht eine weiter zurück, Spuren ohne Input bleiben unberührt
- B lang drückendie aufgenommenen Clips der Szene zwei Szenen tiefer kopieren (siehe unten)
- C lang drückenstoppt den Transport von Live — und damit alles
Aufnahmestart und -ende folgen Lives Clip-Quantisierung. Die Auswahl springt sofort weiter; der alte Clip nimmt trotzdem bis zum nächsten Quantisierungspunkt auf.
Aufnahmen rückwärts löschen
Lang auf A drücken löscht die zuletzt mit A gestartete Aufnahme — auch wenn die Auswahl danach schon zur nächsten Spur gesprungen ist — und springt zurück auf ihren Slot, sodass der nächste Tritt dort neu aufnimmt. Jeder weitere lange Druck löscht die Aufnahme davor. Sind alle Aufnahmen dieser Sitzung gelöscht (oder Live wurde neu gestartet), geht es vom ausgewählten Slot aus rückwärts weiter: Spuren nach links, dann die vorige Szene ab der letzten Spur. Spuren ohne Input und Spuren außerhalb des Aufnahme-Bereichs werden nie gelöscht. Weil A kurz auf Release steht, startet die Aufnahme beim Loslassen des Schalters; mit Lives Clip-Quantisierung fällt das nicht ins Gewicht.
Weiterspringen nach der Aufnahme
Beendest du eine Aufnahme mit A oder startest einen Clip mit PLAY, springt die Auswahl zur nächsten aufnahmefähigen Spur rechts — der nächste Tritt nimmt also gleich dort auf. Nach der letzten Spur geht es eine Szene weiter nach unten auf die erste Spur links. Gruppen-Spuren werden übersprungen; in der letzten Szene bleibt die Auswahl stehen und Live zeigt „Letzte Szene erreicht".
Das gilt auch, wenn du die Aufnahme anders beendest, etwa am Push oder mit der Maus: Steht die Auswahl noch auf dem Slot, der gerade aufgenommen hat, springt sie genauso weiter.
Die Spur, auf der gerade aufgenommen wurde, wird dabei wieder entarmt — sobald ihre Aufnahme wirklich beendet ist, also nach dem Quantisierungspunkt.
Szene zwei Szenen tiefer kopieren
B lang drücken kopiert die aufgenommenen Clips der ausgewählten Szene — alle Spuren mit
Input im Aufnahme-Bereich (> … <) — zwei Szenen tiefer. Fehlen
unten Szenen, legt das Script sie an. Schon belegte Ziel-Slots bleiben unberührt, Spuren ohne Input
und Spuren außerhalb des Bereichs auch. Das Script erledigt alles nacheinander mit kurzen Pausen
(mit angeschlossenem Push ist das sicherer); Live meldet am Ende, wie viele Clips kopiert wurden.
Wie weit kopiert wird, steht in COPY_SCENES_DOWN.
Aufnahme-Bereich festlegen
Liegen im Set Spuren, die nichts mit den Aufnahmen zu tun haben (Click, Zuspieler,
FX …), grenzt du den Bereich über die Spurnamen ab: Die erste Spur bekommt ein
> in den Namen, die letzte ein < — z. B.
„> Drums" und „Bass <". Weiterspringen, Szenenwechsel, Mitstarten und das
Stoppen alter Szenen wirken dann nur innerhalb dieses Bereichs; nach der Spur mit
< geht es direkt in die nächste Szene. Beide Zeichen sind optional,
mit D und F lang gedrückt erreichst du weiterhin jede Spur. Bequemer geht es auf
der Clips-Seite im Browser: Spur antippen, dann „> Start here“ oder „End here <“ —
das Script setzt die Zeichen selbst und entfernt sie bei der bisherigen Spur. Auf dem MC6-Display erscheinen die
Namen ohne die Zeichen.
Spuren ohne Input starten mit
Spuren, die nicht aufnehmen können (kein Input, z. B. vorbereitete Loops), werden
beim Weiterspringen übersprungen — ihr Clip in der aktuellen Szene startet dabei
aber quantisiert mit. Liegen solche Spuren links von der ersten Aufnahme-Spur,
starten sie zusammen mit der ersten Aufnahme der Szene. Gruppen-Spuren werden nicht
gestartet. Abschaltbar mit LAUNCH_SKIPPED_TRACKS = False.
Szenen im Arrangement mitschreiben
Schaltest du bei stehendem Transport REC ein (Arrangement-Aufnahme), legt das Script am Ende des Sets
eine MIDI-Spur „Scene Log“ mit einem leeren Clip pro Szene an. Nach dem Start startet es dort bei jedem Szenenwechsel den Clip
mit dem Szenennamen — genau dann, wenn die neue Szene einsetzt. Live nimmt den Clip wie jeden
Session-Clip ins Arrangement auf; danach steht dort über die ganze Aufnahme, welche Szene wann
lief. Die Spur hat keinen Input und gehört nie zum Aufnahme-Bereich.
Abschaltbar unter ⚙ Settings oder mit LOG_SCENES = False.
⚠ Mit Ableton Push: Legt ein Script eine Spur an, während das Push-Script läuft, kann Live abstürzen. Lege die Spur deshalb vorher selbst an: eine MIDI-Spur mit dem Namen „Scene Log“ (genau so geschrieben) und Input „No Input“. Das Script findet sie am Namen und legt keine neue an. Stürzt Live trotzdem ab, schalte „Log scenes in the arrangement“ aus, solange der Push angeschlossen ist.
Neue Szene, alte aus
Startest du mit A eine Aufnahme auf der ersten Spur einer Szene, stoppen alle
Clips, die noch in anderen Szenen laufen — quantisiert, also genau dann, wenn die
neue Aufnahme beginnt. So klingt die vorherige Szene bis zum Einsatz weiter und ist
danach komplett aus. Abschaltbar mit STOP_OTHER_SCENES_ON_FIRST_RECORD = False.
Rückmeldung
Displays & LEDs
Name der ausgewählten Spur
Name der ausgewählten Szene — ohne Namen „Szene 3" usw.
RECORD bei leerem Slot, PLAY sobald dort ein Clip liegt, NO INPUT auf einer Spur ohne Input — dort kann nicht aufgenommen werden
Aufnahme läuft oder wartet auf den Start
auf der ausgewählten Spur läuft ein Clip
Die Namen werden per SysEx nur temporär überschrieben, deine gespeicherte Bank bleibt unverändert. Nach einem Bankwechsel am MC6 Pro stehen dort wieder die gespeicherten Namen, bis du den nächsten Schalter trittst. Umlaute erscheinen als ae/oe/ue.
Im Toggle Mode wechselt das MC6 Pro beim Tritt kurz selbst die Farbe. Das Script setzt sie direkt danach wieder auf den echten Zustand — ein kurzes Flackern ist normal.
Ohne Fußschalter
Im Browser steuern
Zusammen mit LooperDisplay (ab 1.8)
gibt es das MC6 Pro auch im Browser — auf dem Mac oder auf einem Tablet im selben
WLAN. Die Seite /clips (in der Looper-Anzeige oben „🎛 Clips") zeigt die
sechs Schalter mit Spur, Szene und RECORD/PLAY, kurz und lang tippen wie am Gerät.
Darunter liegt eine Übersicht aller Spuren und Szenen: laufende Clips grün, Aufnahmen
rot, die letzte Aufnahme markiert, Spuren ohne Input schraffiert mit „⊘ no input“; ein Tipp auf einen Slot wählt ihn aus.
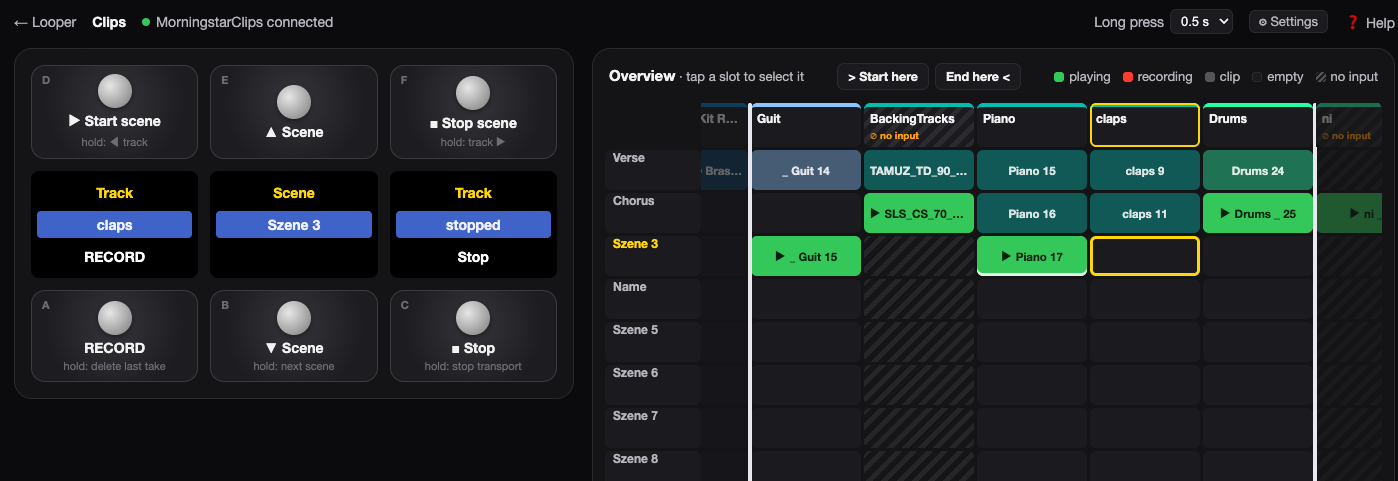
Die Clips-Seite: links das MC6 Pro, rechts die Übersicht — die hellen Linien markieren den Aufnahme-Bereich von „>“ bis „<“.
- VoraussetzungLooperDisplay läuft auf demselben Mac wie Live, MorningstarClips ist als Bedienoberfläche gewählt
- Adresse
http://localhost:8080/clips, fürs Tablet die Adresse unter „📱 Tablet" plus/clips - ParallelMC6 Pro und Browser dürfen gleichzeitig laufen, beide steuern dasselbe Script
- Aufnahme-BereichSpur antippen, dann „> Start here“ oder „End here <“ — das Script setzt
>bzw.<in den Spurnamen und entfernt es bei der bisherigen Spur (in Live mit Undo umkehrbar) - ⚙ SettingsSchalter für den Betrieb, siehe unten — gespeichert in
~/Library/Application Support/MorningstarClips/settings.json, bleiben über Neustarts und Updates erhalten
⚙ Settings
| Schalter | Wirkung | Voreinstellung im Script |
|---|---|---|
| Disarm previous track | Nach dem Weiterspringen wird die Spur, auf der gerade aufgenommen wurde, entarmt — sobald ihre Aufnahme beendet ist | DISARM_ON_ADVANCE |
| New scene stops the old one | Die erste Aufnahme einer Szene stoppt die Clips anderer Szenen im Aufnahme-Bereich — quantisiert, genau zum Einsatz | STOP_OTHER_SCENES_ON_FIRST_RECORD |
| Launch tracks without input | Übersprungene Spuren ohne Input (z. B. vorbereitete Loops) starten ihren Clip beim Weiterspringen mit | LAUNCH_SKIPPED_TRACKS |
| Show MC6 Pro and overview | Aus: das Script baut MC6-Ansicht und Overview im Browser gar nicht erst auf — spart Rechenleistung in Live (hilfreich auf knappen Rechnern, wenn Aufnahmen knacken). Das MC6 Pro mit seinen Displays und die Transport-Leiste arbeiten normal weiter. Während einer Aufnahme wird die Overview ohnehin nur einmal pro Sekunde aktualisiert | SHOW_BOARD |
| Log scenes in the arrangement | Läuft die Arrangement-Aufnahme (REC), startet bei jedem Szenenwechsel auf der MIDI-Spur „Scene Log“ ein Clip mit dem Szenennamen — Live nimmt ihn mit auf. So steht im Arrangement, welche Szene wann lief | LOG_SCENES |
Alle sind ab Werk an. Die Werte im Script gelten nur, solange im Browser noch nichts umgeschaltet wurde.
Das Script schickt seinen Zustand per UDP an Port 11007 und nimmt Befehle auf 11008
an. Abschalten mit WEB_ENABLED = False.
Referenz
MIDI-Befehle
Alle Befehle sind Control Changes auf MIDI-Kanal 1, ausgelöst bei jedem Wert größer 0 (am besten 127). Damit lässt sich auch jeder andere Fußschalter anbinden.
| CC | Funktion |
|---|---|
| 20 | Szene hoch |
| 21 | Nächste Szene, erste Spur im Aufnahme-Bereich |
| 22 | Spur links |
| 23 | Spur rechts |
| 24 | Arm an/aus (beachtet „Exklusiv-Arm") |
| 25 | Record / Play |
| 26 | Play |
| 27 | Stop Spur |
| 28 | Alle Clips stoppen |
| 29 | Undo |
| 30 | Clip im ausgewählten Slot löschen |
| 31 | Letzte Aufnahme löschen |
| 32 | Clips der Szene 2 Szenen tiefer kopieren |
| 33 | Szene starten (im Aufnahme-Bereich) |
| 34 | Szene stoppen (im Aufnahme-Bereich) |
| 35 | Transport stoppen |
Zurück ans MC6 Pro schickt das Script CC 2 / CC 3 (Toggle-Position eines Presets) und SysEx-Nachrichten für die Namen.
Für Bastler
Anpassen
Alle Einstellungen stehen oben in MorningstarClips/MorningstarClips.py.
DISARM_ON_ADVANCE, STOP_OTHER_SCENES_ON_FIRST_RECORD und
LAUNCH_SKIPPED_TRACKS sind dabei nur die Voreinstellung — umgeschaltet
werden sie bequemer auf der Clips-Seite unter ⚙ Settings.
CHANNEL = 0                    # Eingangskanal: 0 = Kanal 1 … 15 = Kanal 16
CC_SCENE_UP = 20               # … CC-Nummern der Befehle
FEEDBACK_CHANNEL = 0           # MIDI Channel des MC6 Pro
PRESET_REC = 0                 # Preset für die Aufnahme-LED (0 = A)
PRESET_STOP = 2                # Preset für die Wiedergabe-LED (2 = C)
NAME_ON_MAIN_DISPLAY = True    # Spurname im linken Display
SCENE_ON_BANK_NAME = True      # Szene im mittleren Display
NAME_PRESET = None             # Spurname zusätzlich auf einem Preset (0 = A)
REC_LABELS = ('RECORD', 'PLAY') # Beschriftung von A (None = aus)
NO_INPUT_LABEL = 'NO INPUT'    # A auf einer Spur ohne Input
MC_DEVICE_ID = 0x06            # MC6 Pro (MC8 Pro = 0x08)
DISARM_ON_ADVANCE = True       # vorherige Spur nach der Aufnahme entarmen
STOP_OTHER_SCENES_ON_FIRST_RECORD = True  # Aufnahme auf erster Spur stoppt andere Szenen
LAUNCH_SKIPPED_TRACKS = True   # übersprungene Spuren ohne Input mitstarten
RANGE_START = '>'              # Zeichen für die erste Spur im Aufnahme-Bereich
RANGE_END = '<'                # Zeichen für die letzte Spur
WEB_ENABLED = True             # Zustand an LooperDisplay senden (Browser-Ansicht)
WEB_STATE_PORT = 11007         # Zustand an den LooperDisplay-Server
WEB_COMMAND_PORT = 11008       # Befehle aus dem Browser
SETTINGS_FILE = '~/Library/Application Support/MorningstarClips/settings.json'
Nach einer Änderung ./install.sh erneut ausführen und Live neu starten.
Wenn etwas hakt
Fehlersuche
- Script fehlt in der Listeliegt der Ordner unter
~/Music/Ableton/User Library/Remote Scripts/MorningstarClips? Live neu starten - Tritte bewirken nichtsEingang im Slot prüfen; sendet das MC6 Pro auf Kanal 1?
- LEDs reagieren nichtAusgang im Slot, MIDI Channel am MC6 Pro und Toggle Mode bei A und C prüfen
- Keine Namen im DisplayAusgang im Slot prüfen; beim MC8 Pro
MC_DEVICE_ID = 0x08setzen - Clips-Seite: „not connected"LooperDisplay ab 1.8 läuft auf demselben Mac, MorningstarClips ab 1.1.1 ist in Live gewählt? Live nach einem Script-Update neu starten
- Fehlermeldungenin
~/Library/Preferences/Ableton/Live <Version>/Log.txtnach „MorningstarClips" suchen
Kleingedrucktes
Lizenz
MIT-Lizenz — frei nutzbar, auch zum Anpassen und Weitergeben. Quellcode und Releases auf GitHub. Morningstar, MC6 Pro, Ableton Live und Push sind Marken ihrer jeweiligen Inhaber; dieses Projekt ist nicht mit ihnen verbunden. Die Schrift Fraunces steht unter der SIL Open Font License und wird direkt von dieser Seite geladen.